Concrete is the backbone of modern infrastructure, but even this robust material isn’t immune to wear and tear. When it comes to repairing concrete, surface preparation is not just a preliminary step; it is the foundation upon which the entire repair process is built. Inadequate preparation can lead to premature failure of the repair, wasting time and resources. Let’s discuss the critical steps of surface preparation that ensure the longevity and effectiveness of concrete repairs.
Step 1: Cleaning the Surface
The first step in preparing a concrete surface for repair is thorough cleaning. This stage is crucial because repair materials will not adhere properly to dirty or contaminated surfaces. Dust, debris, oils, and existing paint must be completely removed to ensure a clean concrete surface for the repair materials.
For effective cleaning, physical methods such as sandblasting, grinding, or pressure washing are recommended. These methods help remove contaminants and provide a fresh surface for the repair material to bond with. Remember, the cleaner the surface, the better the adhesion and, consequently, the longer the lifespan of the repair.
Step Creating a Concrete Surface Profile (CSP)
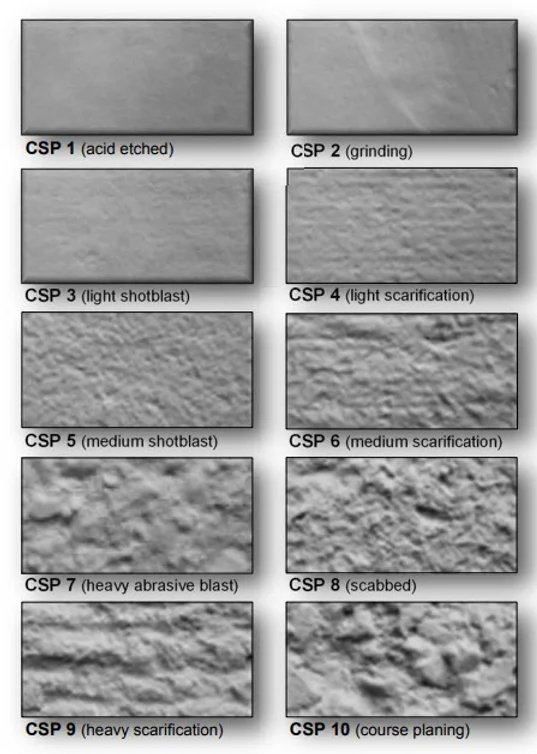
Once the surface is clean, the next step is profiling. This involves creating a roughened surface to improve the mechanical bond between the existing concrete and the repair material. The Concrete Surface Profile (CSP) scale, which ranges from CSP 1 (nearly flat) to CSP 10 (extremely rough), is used to standardize the surface texture needed for different types of repairs.

For most concrete repair scenarios, a CSP of 3 to 5 is suitable. This can be achieved through methods such as shot blasting or acid etching, depending on the specific requirements of the project. A properly profiled surface increases the surface area for the repair material to adhere to, significantly enhancing the durability of the repair.
Step 3: Saturating the Surface Dry (SSD)
After profiling, the concrete needs to be brought to a Saturated Surface Dry (SSD) state. This means the pores of the concrete are filled with water, but the surface is dry to the touch. This condition is crucial for two main reasons. First, it prevents the dry, porous concrete from absorbing water from the repair material, which could lead to an improper cure and weak bond. Second, it helps ensure that the repair material fully contacts the concrete without air pockets, which can lead to voids or weak spots.
Achieving SSD typically involves lightly dampening the concrete after cleaning and profiling. The surface should not have standing water as this can dilute and weaken the repair material.
Step 4: Applying a Primer or Bonding Agent
A common step, often overlooked in the repair process, is the application of a primer or bonding agent. Products like SpecChem’s Strong Bond or SpecWeld serve as the “glue” that further enhances the bond between the old concrete and the new repair material.
Strong Bond should be applied while still tacky, ensuring that it doesn’t dry out completely before the repair material is added. This ensures maximum bonding strength. On the other hand, SpecWeld works differently; it should be allowed to dry completely, forming a re-emulsifying bond that integrates with the repair material for a solid, unified surface.
Step 5: Choosing and Applying the Right Repair Material
Once the surface is properly prepared, the correct repair material, such as SpecChem’s DuoPatch, can be applied. The choice of repair material will depend on the specific requirements of the project, including the depth of the repair, environmental conditions, and expected load on the repaired area.
Applying the repair material correctly is just as crucial as the preparation. Follow the manufacturer’s instructions for mixing, applying, and curing the repair material to ensure the best results. Remember, the success of the repair depends as much on the quality of the application as on the quality of the surface preparation.
The Foundation of Success
Proper surface preparation is the linchpin of effective concrete repair. By following these essential steps—cleaning, profiling, saturating, priming, and applying the right repair material—contractors can ensure that their repairs will last for years to come. SpecChem is committed to providing not only high-quality repair products but also the knowledge and support needed to use them effectively. Remember, a repair is only as good as the foundation it’s built upon.


