Introduction: Why Control Joints Matter in Industrial Flooring
Control joints are an essential part of any industrial concrete floor. They allow concrete floors to withstand heavy loads while reducing cracks and damage that come with heavy traffic loads. When it comes to maintaining industrial concrete surfaces, proper control joint filling and joint filler maintenance is a critical step. Whether you’re working on a commercial or industrial project, the right technique and materials can make all the difference. In this guide, we’ll walk you through the essential steps for successfully filling and sealing control joints in your concrete surfaces.
Step 1: Preparing the Joint – The Key to Effective Filling
Concrete control joints must be clean, dry, and free of curing compounds, densifiers, sealers, and any other foreign substances. To remove the above, use a vacuum-equipped, dry-cut abrasive blade and oil-free compressed air to remove any water or dust prior to applying your joint filler.
Step 2: Applying Spec CJ Guard for Optimal Protection
Use SpecChem’s Spec CJ Guard to prevent or reduce staining on concrete due to overfill of joint fillers. Apply Spec CJ Guard to the concrete adjacent to the control joint with a 2”- 4” paint roller prior to filling with a control joint filler. Spec CJ Guard dries to form a clear, protective film that seals and protects the surface around the control joint. Spec Guard CJ also makes shaving the joint a little easier as well.
Step 3: Choosing the Right Filler – Epoxy vs. Polyurea Solutions
SpecChem offers Epoxy and Polyurea control joint filler options.
Epoxy joint fillers offer optimal hardness, typically 80-85 Shore A durometer, while maintaining enough flexibility to help prevent welding the slabs together. Epoxy joint filler can be used on damp joints without off-gassing or bubbling. Epoxy joint fillers have a longer set time of 12 or more hours before shaving can begin. After the set, before shaving, epoxy joint fillers often need to be heated with a propane torch to be shaved flush with the floor and avoid chattering.
SpecChem’s epoxy joint filler, SpecPoxy CJ, is a semi-rigid, 100%-solids control joint filler, designed with a high shore A durometer. This means SpecPoxy CJ can handle the heaviest forklift traffic in commercial or industrial situations. SpecPoxy CJ comes in a 1-to-1 ratio and is easily poured or pumped into control joints.
Polyurea joint fillers are also semi-rigid, but slightly more flexible with a higher elongation to resist tearing or slab welding. Polyurea joint fillers have a pourable/pumpable consistency and like epoxy joint fillers, are resistant to damp or moist joints. The main benefit of polyurea control joint fillers is their accelerated set time. Polyurea joint fillers can be shaved within 30 minutes of being applied – and do not require heating with a torch to get a smooth shave. This makes them ideal for applications on existing warehouse floors where operations are currently taking place. Polyurea joint fillers can also be used in very cold temperatures (-20oF) ideal for freezer or low-temperature applications.
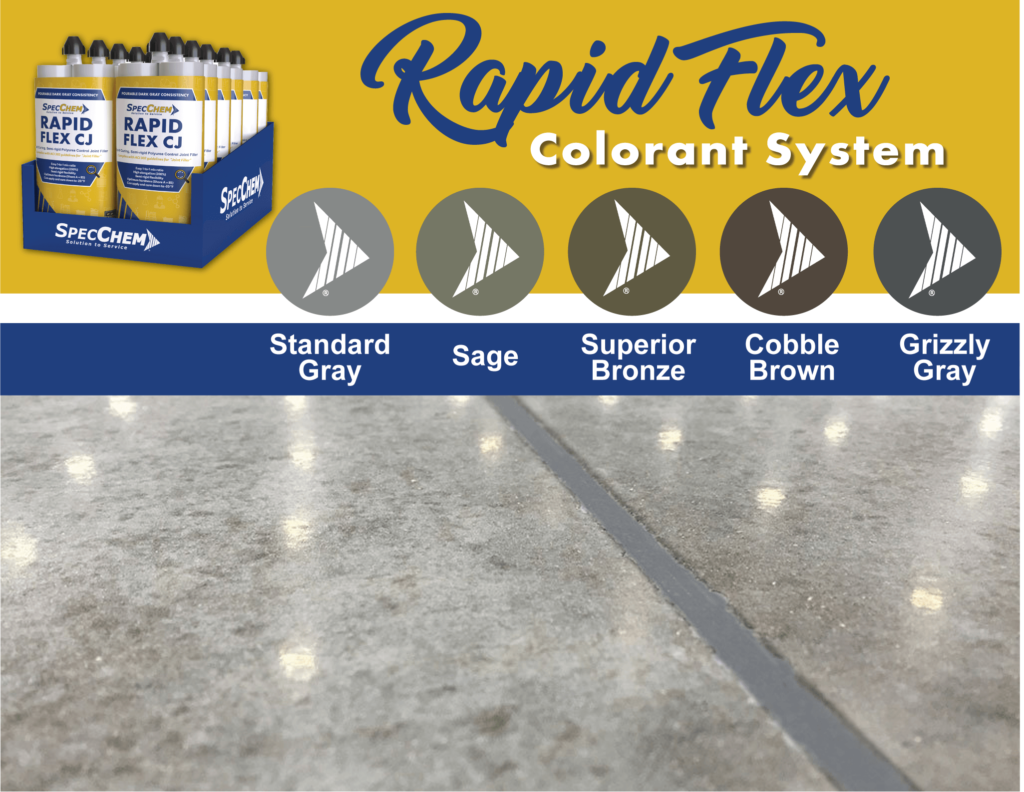
SpecChem offers two polyurea joint fillers, Rapid Flex CJ and Rapid Flex 90. Rapid Flex CJ has extremely high elongation of 200%. This allows for plenty of excessive movement within the slab. Rapid Flex CJ‘s shore hardness of 85 is ideal for handling hard-wheeled traffic while allowing for a moderate amount of movement. Rapid Flex 90 has all the benefits of Rapid Flex CJ, but has a Shore A hardness of 90, meaning it can handle heavier hard-wheeled traffic, much like an epoxy joint filler.
Polyurea joint fillers can come in a variety of colors as well. SpecChem offers 5 color options for jobs where aesthetics are important.
Step 4: Precision Filling Techniques for Long-lasting Results
If using a convenient 22 oz cartridge, shake the cartridge for 1-2 minutes to thoroughly mix the components. Pump the mixed material into a waste container until you see a uniform grey consistency. If using a 10-gallon a proper mix is essential for best results. Before pouring into your applicator tanks, slow stir each mixture separately. Once stirred or mixed, add the part A & B components at a 1:1 ratio in their respective tanks of a low-pressured metered pump. Prior to applying to the joint, purge any cleaning solvent or lubricating oil from the lines. Pump a small amount into a waste container until a uniform grey consistency is achieved.
Per ACI and PCA guidelines, control joint fillers should be installed at full depth in the saw-cut control joints and a minimum of 2” in joints greater than 2” deep. Do not use a compressible backer rod to reduce volume. Control joint fillers should be applied to a minimum depth of 1”. Joints should be slightly overfilled avoiding any excess waste
Installing joint filler should take place as late as possible (60-90 days following new slab placement) to maximize shrinkage of the slab, per ACI 302.
Step 5: Expert Shaving Methods for a Flawless Finish
Shave smoothly as early as 15 minutes after application for Rapid Flex CJ and Rapid Flex 90, and up to 24 hours later for SpecPoxy CJ, depending on variables such as job site conditions, concrete or ambient temperatures. Shave flush in a diagonal motion with a sharp razor floor scraper. Control joint filler must be shaved flush with the floor to properly transfer wheel loads.
Step 6: Efficient Cleanup and Maintenance Tips
If the joint is heated to facilitate shaving, the exposed films may flake, deteriorate, or come off during shaving. Simply saturate the remainder with water, allow to dissolve for 5 minutes, then scrape up with a mop or remove with a scrubber. Clean up any remaining residue from the Spec CJ Guard with water.
Proper control joint filling and joint maintenance can help ensure the longevity and functionality of your concrete floors. By following these steps, you can achieve durable and visually appealing results as well as ensure the safety of your concrete flooring.
So, whether you opt for the strength of SpecPoxy CJ epoxy filler or the flexibility of Rapid Flex CJ and Rapid Flex 90, you’re equipped with the knowledge to tackle your control joint filling project effectively. Remember, timely shaving and proper cleanup are equally crucial steps in this process.
With the right products, tools, and techniques, you’ll be able to maintain the integrity of your concrete floors and extend their lifespan significantly.